
What Is A 301 Redirect and Why Would I Need One?
A 301 redirect is a permanent redirect from one URL to another. 301 is the HTTP status code given that tells browsers (and search engines) that this content is now located over at a new address. In addition to the notice it will reload the browser with the new URL. When a 301 redirect is implemented, it passes most of the link equity (ranking power on search engines) along with it to the new URL. At least most of the time that is the case. Now obviously this is something that comes in handy when moving to a new domain or swapping over your blog posts from one service to another but another popular usage of it is when websites with quality backlinks go for sale or their domains end up in auction. I talk a little more about that later on in this post.
Why Choose a 301 Redirect?
You should use a 301 redirect when you want to permanently move a page or an entire website to a new URL. It’s the best choice for SEO because it transfers most of the link equity to the new page. In contrast, a 302 redirect is temporary and doesn’t pass as much link equity. Choose a 301 redirect when:
- You’re permanently changing your URL structure.
- You’re moving to a new domain
- You’re consolidating multiple pages or websites

Easy 301 Redirects With Your Web Server
So for all the different sources you can use to implement a 301 redirect, I will show you the same three different example scenarios so you can get a good idea of what you need to customize for your own needs.
Nginx
For Nginx, you’ll need to modify your server block in the Nginx configuration file (usually located at /etc/nginx/nginx.conf or /etc/nginx/sites-available/default).
Scenario 1: Updating a single URL on the same domain
server {
    ...
    rewrite ^/blogone$ /blog/blogone permanent;
    ...
}
Scenario 2: Redirecting to a new domain
server {
    ...
    rewrite ^/blogone$ https://example22.com/blogone permanent;
    ...
}
Scenario 3: Redirecting multiple pages to another domain’s root
server {
    ...
    rewrite ^/blog/(.*)$ https://example22.com permanent;
    ...
}
After making any changes always test your nginx config files before reloading nginx:
nginx -t
sudo systemctl reload nginx
Apache
For Apache we’re going to be creating a file name ‘.htaccess’ and placing it in our websites root directory. Make sure it has the period in front of the name.
Scenario 1: Updating a single URL on the same domain
RewriteEngine On
RewriteRule ^blogone$ /blog/blogone [R=301,L]
Scenario 2: Redirecting to a new domain
RewriteEngine On
RewriteRule ^blogone$ https://example22.com/blogone [R=301,L]
Scenario 3: Redirecting multiple pages to another domain’s root
RewriteEngine On
RewriteRule ^blog/(.*)$ https://example22.com [R=301,L]
After making changes you might need to restart apache.
sudo systemctl restart apache2

Easy 301 Redirects Using Programming
PHP
PHP redirects are server-side and can be implemented as follows:
Scenario 1: Updating a single URL
<?php
if ($_SERVER['REQUEST_URI'] === '/blogone') {
    header("HTTP/1.1 301 Moved Permanently");
    header("Location: /blog/blogone");
    exit();
}
?>
Scenario 2: Redirecting to a new domain
<?php
if ($_SERVER['REQUEST_URI'] === '/blogone') {
    header("HTTP/1.1 301 Moved Permanently");
    header("Location: https://example22.com/blogone");
    exit();
}
?>
Scenario 3: Redirecting multiple pages to another domain’s root
<?php
if (strpos($_SERVER['REQUEST_URI'], '/blog/') === 0) {
    header("HTTP/1.1 301 Moved Permanently");
    header("Location: https://example22.com");
    exit();
}
?>
Javascript
So I’m including this next one because I’ve seen this in practice before but it really isn’t going to be recommended unless it’s your only choice. This is because sites like Google claim their web-crawlers don’t read javascript.
Scenario 1: Updating a single URL on the same domain
<script>
if (window.location.pathname === '/blogone') {
    window.location.replace('/blog/blogone');
}
</script>
Scenario 2: Redirecting to a new domain
<script>
if (window.location.pathname === '/blogone') {
    window.location.replace('https://example22.com/blogone');
}
</script>
Scenario 3: Redirecting multiple pages to another domain’s root
<script>
if (window.location.pathname.startsWith('/blog/')) {
    window.location.replace('https://example22.com');
}
</script>
HTML Meta Refresh
So this is the old school way from back when you didn’t have access to making new files in the root directory or even seeing what the server config looked like. It’s not recommended if you have any other options but it will still work to an extent.
Here’s a few examples of the redirect, it’s pretty basic.
<meta http-equiv="refresh" content="0; URL='/blog/blogone'" />
<meta http-equiv="refresh" content="0; URL='https://example22.com/blogone'" />
<meta http-equiv="refresh" content="0; URL='https://example22.com'" />

Easy 301 Redirects To Your Blog/CMS
This is if you’d rather have your blog or CMS system handle it for you.
WordPress
Here are three completely free plugins that are all geared toward different types of 301 requirements.
Simple Website Redirection
This plugin was designed for one single purpose - to redirect the entire website (except the WordPress back-end) to somewhere else. You can also have it use a 302 redirect (temporary) to test your settings before switching it to a permanent 301.
Redirection
This is probably the most powerful of all the redirection plugins that are completely free. It was designed to be able to handle and remember thousands of different redirects and includes the ability to customize them all. From single pages to full directories it also has the ability to use regular expressions so you can create dynamic redirect patterns that it will follow. A cool feature on this one is it keeps track of every redirected visitor (ip/geo/referrer/header/browser) and allows you to also set redirection rules based on who is trying to access that page. Redirect only users with certain countries, browsers, referrers, if even if they have a certain cookie. It also has WP CLI enabled for automating the entire thing!
Ghost
You’ll first need to go into your admin panel to Settings then click on Labs. Under Redirects click the “Download current redirects” link and you should get a file named redirects.yaml. It has two types of redirects and they work as list headers, 301 and 302. Once you’ve edited the file all you have to do is go back to where you downloaded it and upload your new one. Removing the redirects is as simple as uploading an empty .redirects.yaml file.
Scenario 1: Updating a single URL on the same domain
301:
  /old-postname/: /new-postame/
Scenario 2: Redirecting to a new domain
301:
  domain.com/post-slug/: domain22.com/post-slug/
Scenario 3: Using regex to redirect multiple pages while preserving the post-slug. So instead of writing each one out like this:
301:
  /article/article-1: /article-1
  /article/article-2: /article-2
  /article/article-3: /article-3
You could just have this one regex line and it would cover them all.
301:
  ^\/article\/([a-z0-9-]+)\/$: /$1
So it looks for the article directory and matches with whatever follows. The $1 is the article-1.
Hugo
So built-in to the core of hugo is a page method called Aliases . To be completely honest I don’t think it was meant for any of the use case scenarios we’ve been coming up with as solutions for in this post. Luckily, as with everything in Hugo, you can override it by creating your own version in your layouts folder. So this was taken from [Nick Herrig] (https://nickherrig.com/posts/hugo-external-redirects/ ) who did the leg work for us on this one.
So this is the original alias template that Hugo uses. We’re not going to use this but I wanted you to see how it uses the .Permalink and url variables.
<!DOCTYPE html>
<html lang="{{ site.Language.LanguageCode }}">
  <head>
    <title>{{ .Permalink }}</title>
    <link rel="canonical" href="{{ .Permalink }}">
    <meta name="robots" content="noindex">
    <meta charset="utf-8">
    <meta http-equiv="refresh" content="0; url={{ .Permalink }}">
  </head>
</html>
So what we are going to do is create our own alias template that’s better.
Put this in here: layouts/external-redirect/single.html
{{- template "_internal/alias.html" (dict "Permalink" .Params.url) -}}
Now whenever you want something redirected just put a file there with this frontmatter in it. Replace the URL parameter for where you’d like it to send the user.
---
type: "external-redirect"
url: "https://blog.roboflow.com/security-camera-monitoring/"
title: "Making Megadesk Smart"
date: "2024-03-17"
---

Easy 301 Redirects For IPFS Hosts (Cloudflare, Netlify, etc..)
So most IPFS hosts
have an easy method to setup 301 redirects by putting a single file named _redirects in your root folder. This easy method has been fully embraced by Netlify and many other, lesser known hosts, however depending on your cache settings you might run into problems on Cloudflare (you should be using the cloudflare redirect rule anyways). So if you’re on Netlify or a host that offers ipfs hosting, you probably can just use this method.
/old-url /new-url 301
/another-old-url /another-new-url 301
/blog/aboutmycats.html  https://mycatsaremylifeandyouknowit.com

Really Easy 301 Redirects With Cloudflare
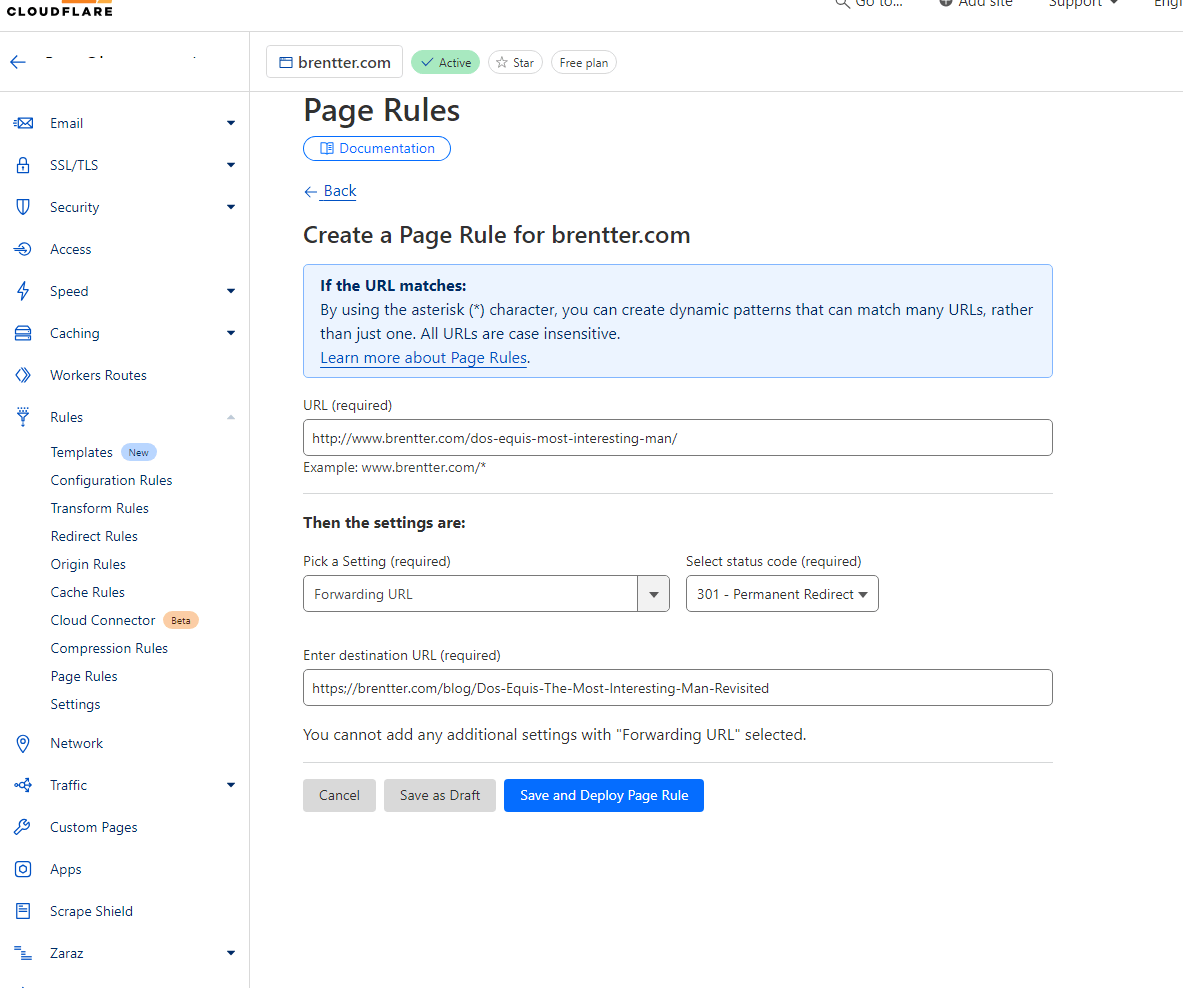
So I run this Hugo blog on Cloudflare pages. So far it’s been great, although it did take some messing around with the cache system to get it working the way I wanted it to. The beauty of using Cloudflare pages is that it comes with a lot of free utilities like a whole bunch of redirect options. The absolute easiest way to setup a 301 redirect in Cloudflare is with a Page Rule. You’re only allowed 3 in the free plan so if you use those up and don’t want to pay for more just switch to the Redirect Rules. If you have a whole lot of complicated rules you need to have them redirect there’s an option for Bulk Redirect Rules that is also covered under the free tier.
To set up a 301 Redirect via Cloudflare, log-in and select the domain involved. You should see towards the bottom of the left menu a category named Rules. Click on that and then on Page Rules. The incoming URI is the first option, in my case I only want to forward one specific URL so it’s pretty simple.
And there you go!
Buying Expired Domains To Redirect For SEO
I will keep this part short because there are countless resources already out that do a much better job that I could at explaining the actual strategy behind which domains to be looking at, but this topic is one that’s been argued about in the SEO community for 15+ years. Even employees at Google have made statements regarding link equity to known purchased domains won’t work only for the truth to come out later in a leaked company document . Here’s the truth, if you’re patient, know what to look for and know what you’re doing then this method absolutely still works. But most people only understand half of what it really means to find a good match. Or they think they have one but never looked at their dns records or what the pages looked like/ran on over the last year. Just using a redirect on any old domain you buy probably won’t do much for your own ranking. It has to be a clean domain that you can match up with your new content. Google keeps track of everything. From the number of recently added links to the history of your site AND the one that’s now redirecting to yours. If the content of the link doesn’t match up or if the anchor tag doesn’t describe the page you now have it going to it then Google won’t give you anything for those links. If that domain was recently used for malware or phishing before you purchased it then Google might actually punish you as you’re now linked with a toxic source.
Being Smart About Your 301 Redirects
I’ll say it again, do your research. One of those acts of due diligence is to always go and get all known links from the WayBack machine to investigate what the actual content looked like, the structure of the site and the tone of it all. Check out the source code on a random page, look at the sitemap if they have one in the archive, etc.. That’s just one out of more than a dozen or so points of interest you should be researching. If you’re still interested start heading down that google rabbit hole for more info. GoDaddy is one of the leading auction houses along with a few other registrars. Well established aggregators like ExpiredDomains.net can provide all of the domain info as well as more filters than you’ll know what to do with (in fact, how to use those filters should be one of your first searches). If you’re having a hard time finding the right domain research resources, here’s one that links just about every useful domain related site that I can think of.
Hope this helped you get those links moving!
~Brent